
Skip to Section
Introduction
I recently got a chance to install and test Panolapse, some time-lapse software with some interesting and unique features. This Panolapse review aims to give a fair and balanced account of my experience using the software.
Just like you’d expect from any time-lapse creation software, Panolapse (or Panolapse 360 as it is also known) allows you to stitch photographs together to produce a smooth, flowing time-lapse video.
Is that it? Well, no! Panolapse has a unique feature that allows you to add panning and zooming effects to your final video, similar to what can be achieved using expensive motion control hardware, only it achieves this result using only software techniques.
What is Panolapse?
Panolapse is software that takes your static time-lapse photographs and stitches them together into a smooth time-lapse video, whilst adding advanced three-dimensional panning and zooming effects.
Time-lapse creation software
If you already have a series of time-lapse photos, or you are planning to shoot a time-lapse sequence, then time-lapse software is something you’ll probably need.
Depending on your exact requirements, Panolapse will turn these photos into a high-definition (or standard definition, if you prefer) video file which you can play like any other video.
What makes Panolapse unique?
If you were to pan across a timelapse sequence in most video production software, it would be painfully clear that the camera remained static and you had just panned the flat images across the screen.
Panolapse maps your sequence over a 3d ‘globe’, adding realistic perspective, meaning the pan/zoom effects really do look like your camera was panning/zooming during the shoot.
The ‘RAWBlend’ feature is also quite unique, scanning and adjusting exposure settings across the sequence of images, producing smooth, flicker-free videos every time.
Panolapse Features
Of course Panolapse has all of the usual features you have come to expect from time-lapse software, such as allowing you to stitch photos together and export them to a video of the desired framerate.
Here are some less common features that Panolapse offers above and beyond the basics…
Rotational Panning/Zooming
The key feature within Panolapseis the rotational pan and zoom.
Unlike typical pan and zoom controls within most video editing software, Panloapse has a hidden trick up it’s sleeve. Your video is mapped onto a sphere, kind of like the effect you may have seen within panorama and augmented reality apps.
By distorting the visual image in this way, the pan and zoom effects look virtually indistinguishable from actually turning the camera on a motion control slider.
Whilst you can sometimes just about tell that the effect has been achieved with software, in my experience the effect is pretty good and considering you don’t have to lug motion control hardware around with you, it’s definitely something you should give a go if you produce time-lapse videos.
Blend frames with RAWBlend
Another one of Panolapse’s flagship features is its ability to smoothly blend between RAW or JPG images. According to the vendor, it allows you to interpolate settings across multiple frames such as exposure, contrast, white balance, vibrance, saturation, fill, shadows and more.
Autoexposure
This feature analyses the aperture, shutter speed and ISO of each image in a time-lapse sequence and automatically adjusts exposure to give a smooth and consistent transition throughout the sequence whilst minimising flicker.
Without an automation feature like this, holy-grail sequences are incredibly difficult to achieve smoothly, so this is a welcome feature indeed.
Deflicker
As any experience time-lapse photographer will tell you, time-lapse flicker removal is an important subject to get to grips with if you want to produce smooth outdoor time-lapse videos. An essential feature then, found in most good time-lapse production software. Panolapse is no exception.
Exposure correction
Just about every photographer knows how easy it is to get exposure wrong when shooting.
Panolapse helps by allowing you to adjust and correct exposure after the fact.
Works with RAW or JPG
If you produce time-lapse videos professionally, or if you are serious about producing professional time-lapse videos, then you should really be shooting and processing images in RAW format.
RAW images are a must if you plan on using Panolapse RAW Blend feature as essential data is saved into RAW images which is lost on convertion to JPG.
You will then need to convert to JPG to use the video production/panning tool.
If you’re just getting into the subject and you’re not sure on the benefits of shooting RAW, then check out our handy blog post on the differences between RAW and JPG.
Works with Fisheye lenses
Since the software supports fisheye lenses, you can account for this and pan/zoom functions will still work without having unnecessary distortion.
Works with stitched panoramas
According to the official website, Panolapse supports 360° equirectangular panoramic images.

I haven’t tried this feature but this could open up some interesting creative opportunities. I do have a fish-eye lense so next time I’m out in the mountains I’ll look out for an opportunity to capture a nice wide scene.
Export to MP4, MOV or JPG frames
Of course Panloapse supports exporting to some of the most popular video formats including MP4, MOV and individual JPG frames.
The ability to export to JPG is a welcome feature as this allows you to add an extra layer of processing if you require depending on your workflow. For example, you may want to touch photos up in Adobe Lightroom prior to being stitched together into a video.
Hands On With Panolapse
When I first launched Panolapse, I assumed I could click on ‘Import image sequence and import all of my RAW images. Unfortunately it looks like this isn’t possible. You can only import JPG images from what I can see.
You can import RAW into the RAW Blend feature, but this is a separate feature used to create holy grail time-lapses which transitions through exposure values and saves them back to the metadata. A cool feature indeed, but create a simple time-lapse video from a sequence of photos, you’re going to have to convert to jpg first.
No worries, I’m used to editing my photos first in Adobe Lightroom anyway.
Importing Photos
Once I had generated my series of JPG images, I went back to Panolapse and hit the ‘Import image sequence’ button again. I selected a sequence of 1300 photos which were imported within a few seconds. No waiting around which was great.
I decided to produce a pretty simple time-lapse video, with a panning effect from left to right, to simulate a camera slider moving along a single axis.
I changed the focal length so that the image was effectively zoomed in, then I selected the first image and dragged my photo to the right, essentially ‘pointing the camera’ to the left side of the image. This will allow me to pan across the image sequence. I then clicked on the last image in my sequence and dragged the image to the left, again ‘pointing the camera’ to the right of the image.
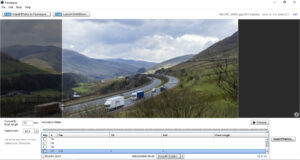
Now my first and last images of the sequence are keyframes. When rendering the output video Panolapse will gradually adjust the Pan, tilt and Roll values across the frames between the keyframes, giving a smooth transition.
Exporting Video
I then hit ‘Export Frames…’ to output my time-lapse video.
On the export settings window, I chose to output with 1080p resolution to MP4 video.
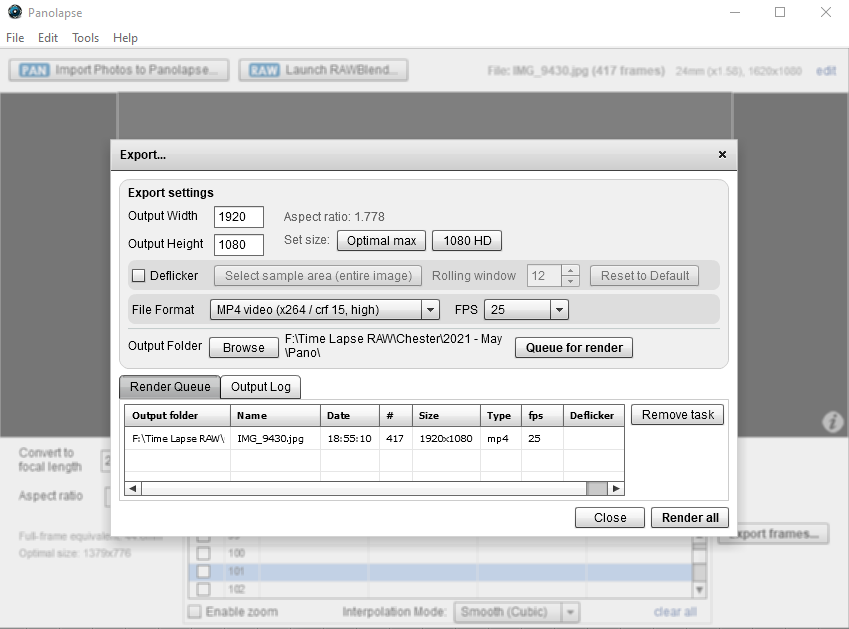
There aren’t a lot of options here, but I found I was able to achieve what I set out to do. There were a couple of things that I think could be improved however. For example, more supported video formats would be nice to see.
The Result
It wouldn’t be a proper Panolapse review without showing the final result!
Overall I was happy with the result I got with just a camera and tripod. 15 minutes of post production is all I needed.
Problems I Encountered
For example, I set the output folder to a new folder within my main project folder. When Panolapse outputted the video (and images) it created a folder of it’s own within the one I created. This is good as it would have saved me creating a fresh folder, but it was totally unexpected, and I ended up with an extra folder. I did this a couple of times after forgetting about it. Not a major problem, but still a bit of an annoyance. Easily corrected though.
Another unexpected quirk was when exporting the video, Panolapse not only outputted the MP4 video that I wanted, but all of the rendered jpg frames into the same directory. I thought I may have accidentally selected ‘export jpg frames’ on the export options page, but there doesn’t seem to be any such option. You can choose to export jpg images instead of mp4, but I chose mp4 and expected just the mp4 to be generated.
In Summary
Overall, I think Panolapse is a good tool. It’s light and efficient to load and run, and it does what it does really well.
I haven’t had chance to test the RAW Blend feature yet, but if it works as advertised, which I expect it will, then it’s worth the license fee for that alone.
For time lapse photographers on a budget who want to achieve the effects of an expensive 2-axis motorised slider and capture that elusive holy grail time-lapse sequence, then Panolapse brings these effects within reach, for less than a couple of rounds of drinks.
If you want to give Panolapse a try, then I recommend downloading the demo version first and giving it a try.
Panolapse vs LRTimelapse
In case you are unaware, LRTimelapse is another popular brand of time-lapse production software which has some similar features to Panolapse.
One key feature of LRTimelapse is the ability to add keyframes and automate the transition of settings through a sequence. It does this by integrating with Adobe Lightroom, automating the powerful image editing capabilities of Lightroom to produce professional level time-lapse video.
Comparing the two, I would say that LRTimelapse, with it’s integration with LRTimelapse is a more fully-featured offering for producing time-lapse videos. However this is an expensive setup, especially considering that you will need costly motion control hardware if you want to pan and zoom.
Chronolapse vs Panolapse
Chronolapse is an entirely different type of software to Panolapse. Whilst Panolapse allows you to produce professional level time-lapse videos from source images from your camera, Chronolapse is primarily intended for capturing images from a camera connected to a computer (or from the screen).
If you are looking for some software to capture photos from a webcam or USB camera on your computer at regular intervals, then you should check out Chronolapse. It’s free and could be just what you need.
How to download Panolapse
You can find the Panolapse download link on the official Panolapse website. This will download the trial version of the software.
You can then unlock the full version of the software by purchasing a license from the same website. You will then receive a license key which you can provide in the software to unlock it.
To download Panolapse, check out the official Panolapse website which contains a Panolapse download link.
Frequently Asked Questions
What operating system will Panolapse run on?
At the time of writing, the software is available for Windows and MacOS.
I tried to install Panolapse on Ubuntu Linux using Wine (software that allows you to run Windows software within Linux), however, it didn’t run properly as fonts weren’t correctly loaded. This is quite common though, most software doesn’t work properly within Wine.
Is Panolapse compatible with GoPro?
In a word, yes. The video file exported by GoPro’s, or most action cameras for that matter, can be imported into Panolapse without any problems.
Any camera that exports video in common formats such as MP4 video should be compatible with Panolapse, including cameras with fisheye lenses.
Does panolapse require lightroom?
Unlike some other time-lapse software, Panolapse does not require Lightroom to be fully functional. Your entire workflow from image files to a final rendered video file can be carried out within the software itself.
You can include Lightroom in your Panolapse workflow, but this is entirely optional and depends on your own particular needs.
Is Panolapse free or is there a license fee?
It is free to install and use Panolapse, however there are some limitations. For example you are limited to standard definition (SD) output video.
To unlock full functionality, you can purchase a license key which enables you to unlock all features including full HD output video.
Panolapse is very fairly priced considering the amount of functionality so we strongly recommend just buying a license instead of trying to find a Panolapse torrent or crack . In my experience this route often results in you getting an outdated version at best, or more often than not you’ll be downloading malware and infecting your computer. It makes sense just to get a proper license. Plus you’ll be supporting the author, so it’s win-win!
Pingback: Time-Lapse Software: Applications You’ll Need For Creating Pro Videos - Pro-Lapse