
Skip to Section
- 1 What is Lightroom?
- 2 Lightroom Features
- 3 Lightroom time-lapse presets
- 4 Lightroom Time-Lapse Plugin
- 5 How much does Lightroom cost?
- 6 How to produce a time-lapse in Lightroom
- 7 Taking it to the next level
- 8 In Summary
This guide to Lightroom time-lapse video production was put together to teach you how to produce time-lapse videos from the images in the camera to a fully produced video using just Lightroom. We have also put together some advanced tips and tricks for the more seasoned time-lapse videographers out there.
Editing a Time-lapse with Lightroom is something you should definitely consider if you are serious about producing time-lapse videos in a smooth and efficient way.
This page is more than just a Lightroom tutorial. There’s plenty of those already. It’s more of an ultimate guide to Lightroom time-lapse.
It wouldn’t be an ultimate guide if it didn’t have something to teach to new players, so let’s start from the basics for the uninitiated:
What is Lightroom?
Lightroom is a mature and widely used software application, which has been actively developed since around 1999 by the creator of Photoshop, Adobe. It’s used by most photographers and time-lapse videographers, since it is widely considered to be one of the best all-round photo editing applications for Windows and Mac computers.
Lightroom Features
Lightroom has all of the features you want from a photo processing suite, plus more. The ability to edit images in bulk makes it ideal for producing time-lapse videos.
Some of the main features used when processing photos for time-lapse include:
Photo library management
Lightroom let’s you manage your photos with a range of intuitive features including collections and smart collections. This lets you group photos like folders on a drive.
Bulk processing of photos
You can copy modifications from a photo and apply (sync) it to all of the other photos you’re working with. You can even select a group of modifications and just apply those to the other images.
Filters
All of the expected exposure and color correction tweaks are here, adjustable by dragging a slider or editing a number.
Non-destructive editing
When you edit a photo in Lightroom, the changes that you make to the image are saved to a separate file, leaving the original photo unchanged. This allows you to revert all edits at any point in time.
RAW file support
Import RAW images directly from your camera and edit them like any other. You can fully and easily adjust light exposure in Lightroom, allowing you to correct under- or over-exposed images as if it was taken right first time!
Creative adjustment tools
Tools such as the graduated filter, adjustment brush and post-crop vignette allow you to get even more creative with your time-lapse video production.
Export images
You can export to all popular image formats
Lightroom time-lapse presets
Presets in Lightroom are a great way to apply a bunch of commonly used settings in a fast and repeatable way. Just click on the desired preset and all of the settings are applied to your selected image.
If you’re serious about time-lapse production and looking to speed up your workflow, then you need to consider using Lightroom presets.
You can buy Lightroom preset packs online in a number of places. When researching this article, I discovered a trove of professional looking preset packs on Etsy. Whilst I couldn’t find any packs specifically targeted at time-lapse photographers, there is no reason why you couldn’t apply any of them to your time-lapse videos for a fast way of achieving a unique and creative style.
How to install a Lightroom preset
More often than not, you will probably be creating your presets within Lightroom itself, rather than importing them from files. However for whatever reason you may find yourself with a preset that you want to import into Lightroom.
If you have some preset files that you would like to import into Lightroom, then follow the steps below to install and enable your presets.
Method 1: From within Lightroom
- Download the preset file to your computer. If it’s compressed in a zip archive, then decompress all files to a folder on your computer.
- Open up Lightroom and go into the ‘Develop’ section (Click on the ‘Develop’ tab to the top right of the main Lightroom window (arrow 1 in the screenshot below).
The presets should show in a list within a pane to the left of the screen (Green box in the screenshot)

- Next at the top-right corner of the Presets pane (arrow 2 in the screenshot) there should be a ‘+’ button. Click it and select ‘Import Presets…’ (arrow 3).
- In the file browser window that pops up, locate the folder where your preset file was saved. Select it, then click on the ‘Import’ button to import the preset.
- Select the preset in the ‘Presets’ list and it will be applied to your image(s).
Method 2: Using Windows Explorer or Mac Finder
- Download the preset file to your computer. If it’s compressed in a zip archive, then decompress all files to a folder on your computer.
- Open another file manager window and navigate to the Lightroom Presets folder. The location of this folder depends on your operating system.
Windows 7/8/10
On Microsoft Windows systems, you can find the Presets folder at the following location:
C:\Users\[user name]\AppData\Roaming\Adobe\Lightroom\Develop Presets
Mac OSX
On Apple Mac systems, you can find the presets folder here:
/Users/[user name]/Library/Application Support/Adobe/Lightroom/Develop Presets
Lightroom Time-Lapse Plugin
You don’t need a plug-in to produce a time-lapse in Lightroom, but a plug-in can certainly speed up your workflow and give you more creative tools.
I you are ready to take your time-lapse to the next level, then you can add extra functionality and features to Lightroom with a Time-lapse Lightroom plugin.
Jeffrey Friedl’s ‘Timelapse Support’ Lightroom Plugin
Developed by Jeffrey Friedl, a dedicated photographer, author, blogger and Lightroom plugin developer, the Timelapse support plugin is handy tool for fading settings in the Develop workflow.
Jeffrey has been actively developing the plugin since 2014 and offers it for free on his website. If you find the plugin useful, then it’s advisable to give a donation to Jeffrey to support development. You can choose how much to donate when registering the plugin.
More information on the plugin, including a download link and installation instructions can be found on the Timelapse Support plugin page of Jeffrey’s site.
Jeffrey has also developed a selection of other Lightroom plugins. Some of these export to various online platforms, others offer features to enhance you workflow and organisation in Lightroom. You can see the full list of plugins here.
LRTimelapse
Another popular and very powerful piece of time-lapse software, LRTimelapse is considered by many as one of the best available.
It integrates with Lightroom, however it also functions as a standalone application and is stuffed full of features that will help you up your time-lapse video production game.
I wrote a detailed review of LRTimelapse so I will save repeating myself here, but it’s something I can recommend personally as I use it quite regularly.
LRTimelapse features
Here are some of the main LRTimelapse features:
Keyframe and grade time-lapse sequences of RAW images
Add keyframes to selected photos so that you can transition settings across images between them.
Animate and keyframe over 400 Lightroom tools
Adjust almost any Lightroom setting between keyframes to account for lighting variations and to add creative effects
Holy Grail Wizard
Allows you to create night-to-day (sunrise) and day-to-night (sunset) sequences
Visual deflicker and LRT motion blur
These tools allow you to remove flickering and add realistic blur effects.
H.264 support
Export to a number of video formats including MP4 H264, with support for up to 8k rendering
TimelapsePlus Studio

This plugin was developed by Timelapse+, a company that already produces a popular hardware intervalometer called the VIEW intervalometer.
Whilst I haven’t used it personally, from what I read on the official website, it appears to offer much of the same features as LRTimelapse, but for a smaller license fee and a couple of extra features such as auto-keyframe and auto-grouping of time-lapse sequence images.
The author admits that it is not a direct competitor to LRTimelapse as it does not actually support rendering of video, but instead aims to “simplify support for postprocessing in Lightroom so that there would be a quick and easy solution that gets great results for the common use-cases rather than a comprehensive application for every situation”.
TimelapsePlus Studio Features
The plugin has loads of time-lapse specific features which aim to speed up and enhance your workflow. Some of these features include:
Auto grouping of time-lapse sequences
Detects and groups time-lapse sequences within the Library view into collections.
Auto identity keyframes
Intelligently recognises transitions in your time-lapse sequences and marks them with a star, so that you can apply transitions more quickly and effectively.
Blend keyframes & animate transitions
Once keyframes have been marked with stars, this feature allows you to blend settings between keyframes, resulting in professional and creative time-lapse productions. This is perfect for achieving the holy-grail effect.
Preview timelapse in Lightroom
You can play through a preview of your time-lapse within Lightroom, to get a feel for the settings effects without having to render a full video.
How much does Lightroom cost?
Adobe used to let you buy Lightroom outright, as a one-off purchase. Sadly, this is no longer the case, you have to pay an ongoing subscription fee to use the software.
At the time of writing, you can access Lightroom for $9.99 per month. This includes 1TB of available cloud storage. Whilst I personally prefer to purchase software outright, for industry-leading software, $9.99 does represent excellent value for money in my opinion.
You can also get a software license for Lightroom and Photoshop together for a slight discount, or the whole Creative Cloud suite if you want it all. Check out the Adobe plans & pricing page for more details and up-to-date prices.
How to produce a time-lapse in Lightroom
Since Lightroom doesn’t support video rendering, you cannot fully produce a time-lapse video within Lightroom alone. However by combining Lightroom with Photoshop, you can indeed produce a full time-lapse video from start to finish.
You might not be able to adjust settings using keyframes, as you can using a plugin, but you can buy a combined Adobe Photoshop and Lightroom subscription for a reduced licence fee which is nice.
If you’re not familiar with Photoshop, or if you’d have more features beyond what Photoshop provides, then you might consider LRTimelapse instead. For the purpose of this guide, we are using Lightroom with Photoshop.
Let’s get into it and start producing a time-lapse in Lightroom. I’m assuming that by now you at least know your way around Lightroom and know how to import, filter and process photos.
Import your photos into Lightroom
If you have already imported your photos, then skip this step. Otherwise, click on ‘File’ then ‘Import Photos & Video’ to open the image file importer window.
From here, you can navigate to the folder on your computer where the RAW (or JPG) images are stored. Select all images you would like to import. It doesn’t have to be just images from a single sequence – you can import them all together and group them into collections later in Lightroom.
At the top centre of the file importer, you will see a row of buttons labelled “Copy as DNG | Copy | Move | Add”. This is what you want the importer to do with all your image files during import. Select the one you want and finally click the “Import” button at the bottom right. Your image files will now be imported into Lightroom.
Retouch your photos
From within the “Library” tab of Lightroom, select the sequence of photos you’d like to include in your video and click on the ‘Develop’ tab.
Select the first image of your sequence from the image thumbnails along the bottom of the window, then proceed to tweak the image tools in the right-hand panel until you get a result that you’re totally happy with.
If you’re new to this, you can find a brief description of the various develop module tools on the official Adobe website.
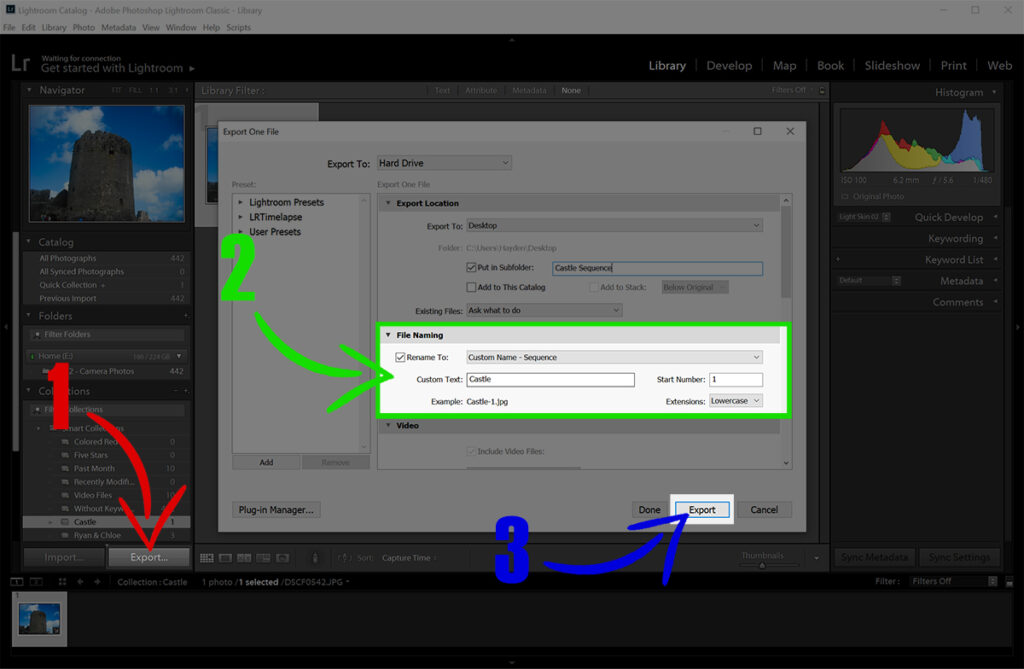
Export sequence image files to disk
Next you need to take your retouched photos and export the sequence to jpeg (.jpg) files. Take care to ensure that the file names are numbered in order. The screenshot below shows the Lightroom export screen. Make sure the “File Renaming” section is configured to rename files to include a number sequence.
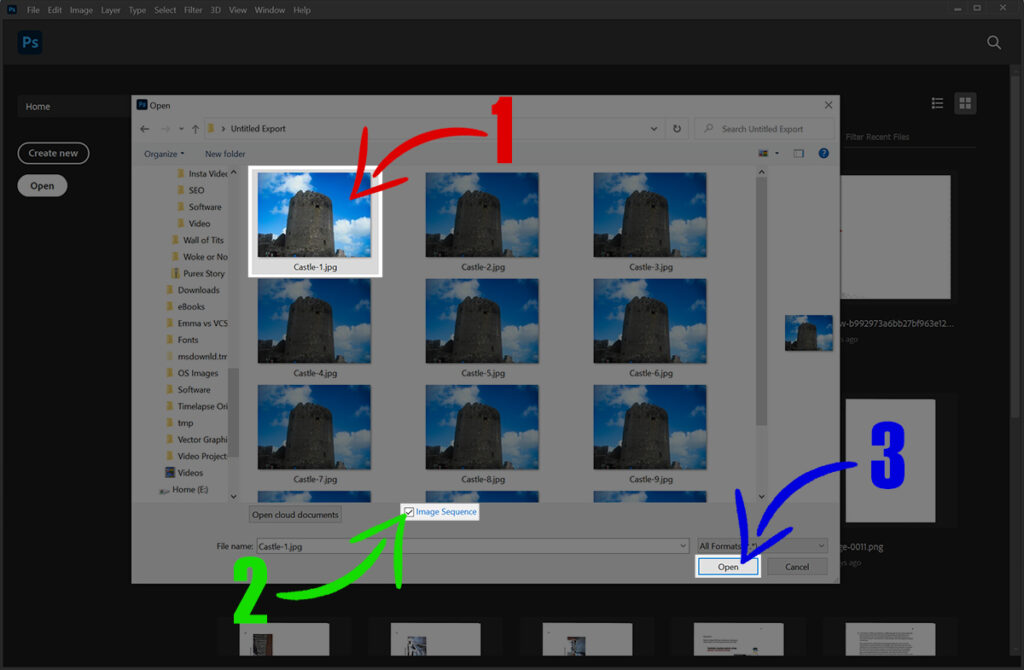
Import images into Photoshop
Start up Adobe Photoshop and select ‘File’ then ‘Open’. When the ‘Open’ dialog opens, browse to the folder containing the photos you exported from Lightroom and highlight the first image of the sequence. Not all of them, just the first one.
Check the ‘Image sequence’ checkbox and then click on the ‘Open’ button. Photoshop will now import all of your images.
Photoshop will now ask you to provide a Frame rate. Videos are commonly 24 or 25fps (frames per second), but if you’d like to slow your video down, generally I would recommend 30fps (bit slower) or even 60fps (much slower).

Your photos will now be imported into Photoshop as a video. Once it’s done, look for the ‘Timeline’ panel at the bottom of the main Photoshop window. If the ‘Timeline’ panel isn’t visible, select ‘Window’ then ‘Timeline’ from the main menu bar.
You can use the Timeline panel to trim the video, adjust playback speed and join together multiple sequences. You can also add keyframes to the timeline for simple transitions and animations.
Render your final video
When you are happy with your timelapse sequence, click on the export button (found at the bottom of the timeline panel).

You will now see the ‘Render video’ dialog, which allows you to customise the video format filename, dimensions and encoding.
If you’re not sure what settings to choose, then click on the ‘Presets’ dropdown to choose the option most relevant to what you want to do with your video and some settings will be automatically selected to meet the intended use.

Taking it to the next level
You can further enhance your time-lapse videos with features such as flicker removal and animation of exposure and other settings, with software such as LRTimelapse or one of the other Lightroom plugins listed earlier in this article.
In Summary
Adobe Lightroom is considered by most time-lapse photographers as the industry standard photo editing software. By learning how to use Lightroom, you are gaining a valuable set of skills that will be useful for the rest of your time-lapse videography career (or hobby).
By extending Lightroom with plugins and secondary software, you will be acquiring the tools you will need to produce professional level, production quality time-lapse videos that live up to your creative ambitions.
Pingback: Time-Lapse Software: Applications You’ll Need For Creating Pro Videos - Pro-Lapse
Pingback: LRtimelapse Review - Pro-Lapse