
Skip to Section
So what is time-lapse photography and why should I care?
Well, if you’ve spent any amount of time on the internet at all, chances are you’ve seen some pretty amazing nature videos.
Particularly, you may have been drawn to videos of beautiful landscapes where time seems to be “fast-forwarded” like an old VHS tape, often to dramatic effect.
These videos utilize the technique known as time-lapse photography, and today, we’ll explore the basics of this exciting and unique visual trend that has exploded over the last 15 years.
So what is time-lapse photography? Let’s start from the beginning…
How Does Time-Lapse Work?
At its core, time-lapse photography simply involves taking a series of images in sequence over an extended period of time, and then displaying them at a rapid frame rate, giving the appearance that the world (and time itself) is “lapsing” before your eyes.
This often produces moody, ethereal results, giving many of these videos their trademark awe-inspiring feel.
Wikipedia has a great introductory page on the subject.
How long does Time Lapse photography take to make?
Making a time-lapse video requires patience and a great amount of care.
To make a three-minute-long video, for instance, you may need to capture several hours worth of footage, and this process can be a slow, painstaking labour of love.
There are a number of special, purpose-built pieces of equipment often used to help photographers capture cinematic time-lapse footage, but today, even something as simple as your smartphone has the capability to produce exciting results.
We’ll explore the equipment that goes into making these videos in greater depth below.
Is Time-Lapse One Word?
There are a number of ways to write it. Time-Lapse, Time Lapse or Timelapse. The most commonly used name is hyphenated (Time-Lapse) which is the way we write it, but really it seems that there is no one correct spelling.
Write it however you want, it all means the same thing!
What is Time-Lapse Photography used for?
There are numerous uses for time-lapse photography, both in personal and professional settings.
Some common applications include:
- Documenting changes in nature over long periods of time: Time-lapse allows us to see slow processes that would otherwise be imperceptible to the human eye, such as plant growth or erosion.
- Capturing construction projects: By setting up a camera to take regular photos of a construction project over months or even years, we can create fascinating videos showing the build from start to finish.
- Creating unique visual effects: Time-lapse has become a staple in film and television, used to show everything from cityscapes to celestial bodies in a new light.
- Recording personal events: More and more people are using time-lapse to add a creative touch to their personal photos and videos, such as capturing the sunrise on a family vacation or documenting their child’s growth over time.
Examples of Time-Lapse Photography in Action
There are countless examples of incredible time-lapse photography around the web, and we thought it would be a good idea to include a few of our favorites here, for reference.
NORWAY – By Morten Rustad
This incredible collection of stunning vistas showcases exactly what makes this sort of photography so special.
30 Days At Sea – By JeffHK
In one of the more unique applications of the technique, videographer JeffHK shows us what life on the open sea is like on one of the world’s largest megaships.
There are so many incredible examples of time-lapse videos here are some more that we think are worth checking out;
- Koyaanisqatsi (1982) – this experimental film is a classic example of the genre and explores themes of technology, nature, and man’s relationship with both.
- Baraka (1992) – another incredible, thought-provoking work that will leave you mesmerized and wanting more.
- TimeScapes (2012) – this time-lapse documentary took several years to produce and features incredible high-resolution photography of some of the most jaw-dropping landscapes on earth.
- Planet Earth II (2016) – this visually stunning nature documentary series features incredible time-lapse footage of animals and landscapes from around the world.
- The Ridge (2013) – a breathtaking and dizzying short film showcasing the beauty of San Francisco’s iconic Golden Gate Bridge.
History of Time-Lapse Photography
The very first examples of time-lapse photography date back to Eadweard Muybridge (yes, that is how he spelled it).
Muybridge was hired by the then-governor of California to prove that his racehorse had tripped several wires attached to still cameras.
Though the governor was wrong and ultimately lost a bet because of it, Muybridge is often credited with creating the base technique still used today in time-lapse photography all over the world.
The first commercial use of this photographic method was by Alan Fanck, in a series of motion pictures he called Bergfilms.
Over the next several decades, the technique would be applied to a number of subjects, such as:
- Plant life
- City development
- Astronomical events
- Fast moving subjects such as a busy highway or busy street
- The motion of the stars in the night sky
- Or even The ‘Holy Grail’ which is a day to night or night to day time lapse technique
Today, just about anyone has access to some form of time-lapse-capable equipment, making the barrier to entry lower than at any other point in history. The same can be said of photography in general, actually.
Basic Equipment Needed
The barrier to entry with time-lapse photography has been shrinking for over a decade, and though some special equipment is still required if you’re looking to get serious, it’s now possible to capture basic time-lapses on something as simple as your smartphone.
Creating Time Lapse on an iPhone
One camera that’s particularly powerful, versatile and easy to use for time-lapse photography is the iPhone.
With a variety of settings and features built-in to the camera app, you can get started with time-lapses right away.
To make your own time-lapse using an iPhone:
- Open the Camera app on your phone;
- Swipe all the way to the right until you see ‘Time-Lapse’;
- Tap the record button;
- Capture your time-lapse, keeping your phone stable to avoid any shaking or movement that can interfere with the final footage.
- Save and share your masterpiece!
Creating Time Lapse on an Android
Similarly, Android devices also have a range of built-in features and time lapse apps that allow for time-lapse photography.
Some popular options include:
- Lapse It – this app offers full manual control over your time-lapse settings, as well as the ability to edit and add effects to your footage.
- Framelapse – another popular option with features such as manual controls, customizable frame rates, and the ability to add music to your time-lapse videos.
- Hyperlapse – this app was created by Instagram and offers a simple and easy way to capture and share stunning time-lapses with just a few taps.
Moreover, advanced gear that used to cost thousands and thousands of dollars can now be found for a fraction of that, allowing you to truly unlock your creativity in more ways than ever before.
So, here’s a list of the three basic components that we feel are essential to capturing a quality time-lapse video:
Time Lapse Camera
Chances are, you probably already have a decent DSLR camera if you’re reading this guide.
If you don’t there’s more good news; there are literally hundreds of models variable to choose from today, all at varying price points, and all compatible with a full range of time-lapse camera equipment.
We’d recommend something with a high ISO range, especially if you’re planning on doing any night-sky time-lapse photography.
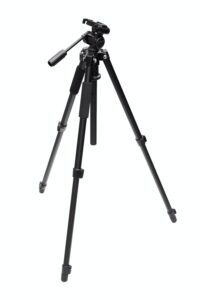
Tripod
A quality, sturdy tripod is a foundational piece of your new time-lapse arsenal. This is how you will steady your footage and ensure that each shot is precisely framed.
While many entry-level options are available, we’d recommend buying the best tripod your budget will allow, with enough weight to steady your camera even on uneven, rocky terrain, especially if you’re interested in taking time-lapse shots out in remote areas where conditions can be constantly changing.
Don’t assume that all tripods are the same and a cheap one will be suitable.
A cheap tripod can wobble, which will be particularly apparent over the course of a full time-lapse sequence, ruining your footage.
This is particularly important when shooting night sky (astro) time-lapse, when you have shutter speeds as slow as 30 seconds or more.
With night time lapses work, your camera has to be perfectly steady to capture the stars as sharp as possible.
There really is no margin for error. The last thing you want is to go to a remote location at midnight, sit in the cold until 3am, then it’s all for nothing because your tripod wobbled slightly in the breeze.
Get the best quality tripod you can afford, you won’t regret it.
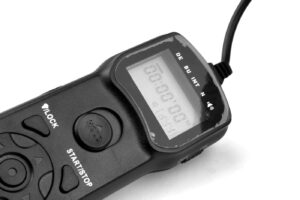 Intervalometer
An intervalometer acts as the beating heart to your time-lapse setup, helping you take hundreds time lapse images with precision timing by automating the task of triggering your shutter every x seconds.
Some of these devices can be quite expensive, while other, more basic models can be found for much less.
In fact, many modern cameras have much of this functionality built directly into the camera body.
Regardless of which model you choose, the intervalometer plays an essential role in helping you put together a compelling time-lapse reel.
There are many other, more advanced pieces of gear that go into the art of capturing time-lapse footage, and we’ll be getting into these in much greater depth in future posts, so be sure to stick around.
In the meantime, if you have any questions about time-lapse photography in general, be sure to leave a comment below, and we’ll do our best to help you out.
What Is The Best Time-Lapse Interval?
The ideal interval, or ‘frames per second’ for taking time-lapse pictures depends on the individual project. The more frequent the interval, the faster the motion will appear in the final video.
To find the ideal interval, check out our time-lapse calculator.
As a rough guide, here are some example intervals:
- People walking/crowds: 2 second interval.
- Clouds moving across the sky: 5-10 second interval.
- Night sky stars: 30 second interval.
The key to getting the right interval is to experiment and get a feel for different values.
It’s all about artistic effect at the end of the day and telling a story. You can’t beat hands-on experience for getting the right settings.
Time Lapse Software
The best time lapse software allows you to quickly and easily edit, compile, and share your time-lapse videos.
Some popular options include:
- Adobe Lightroom – this powerful editing software not only offers basic photo editing features but also has a built-in time-lapse feature.
- LRTimelapse – this software is designed specifically for creating professional-quality time-lapses with advanced editing and keyframe support.
- Final Cut Pro X – a popular choice for video editing, Final Cut Pro X also has time-lapse features and the ability to add music and special effects to your videos.
Ultimately, the best time lapse software will depend on your individual needs and preferences, so be sure to try out different options and find what works best for you.
Camera Settings and Tips
In addition to the gear and software, there are a few other important factors to consider when capturing time-lapse photography:
- Manual Mode – using manual mode on your camera will give you more control over exposure settings and ensure consistency throughout your sequence.
- Manual Focus – it’s best to manually focus your camera instead of relying on autofocus, as it can cause inconsistencies and distractions in your footage.
- Bulb Mode – this mode allows you to take longer exposures (up to 30 seconds) for capturing night sky time-lapses or other low-light scenes.
- Stabilization – make sure your camera is mounted on a stable tripod and avoid touching the camera during the sequence to ensure smooth, steady footage.
- Battery Life – Shooting time-lapse images can drain your camera’s battery quickly, so be sure to have spare batteries or a reliable power source on hand.
Shutter Speed
When it comes to time-lapse photography, shutter speed plays a crucial role in determining the look and feel of your footage.
A general rule of thumb is to use a shutter speed that is double the interval between shots.
For example, if you are taking photos every 5 seconds, then your shutter speed should be around 10 seconds.
Be sure to experiment with different shutter speeds to find the best one for your specific project.
Motion Blur and Flicker
Motion blur and flicker are common issues that can arise in time-lapse photography, but there are ways to minimize or even eliminate them.
Here are some tips to keep in mind:
- Use a low ISO – keeping your ISO low will reduce noise and help prevent motion blur.
- Shoot during the golden hour – capturing images during sunrise or sunset can add a beautiful, natural-looking blur to your footage.
- Avoid abrupt changes in light – this can cause flicker in your time-lapse, so try to shoot during consistent lighting conditions.
- Use software tools – there are various software options available that can help reduce motion blur and flicker, such as LRTimelapse.
Memory Card Capacity
With hundreds or even thousands of images being taken for a time-lapse, it’s important to have enough storage space on your memory card.
Be sure to check the capacity and format your card before each shoot to avoid running out of space midway through.
It’s also recommended to use a high-speed, reliable memory card for smoother image transfers and less chance of data loss.
Conclusion
Time-lapse photography is a fun and rewarding way to capture the passage of time and create stunning visuals.
With the right gear, software, and techniques, you can produce professional-quality time-lapse videos that will impress your audience.
We hope this guide has provided valuable information and tips for getting started with time-lapse photography.
Pingback: Can I Convert A Video Into A Time-lapse Video On iPhone? - Pro-Lapse